-
Broadcast Captioning
-
Live Captioning
-
Transcription
- Articles coming soon
On-Site Captioning using an EEG iCap Encoder
What is iCap?
An EEG iCap encoder is an on-premise device that can be used to encode captions on top of a live video feed.
This device can be used to provide both remote or on-site captioning. We will discuss the setup for on-site captioning in this post. For instructions on remote captioning with an EEG iCap encoder, click here.
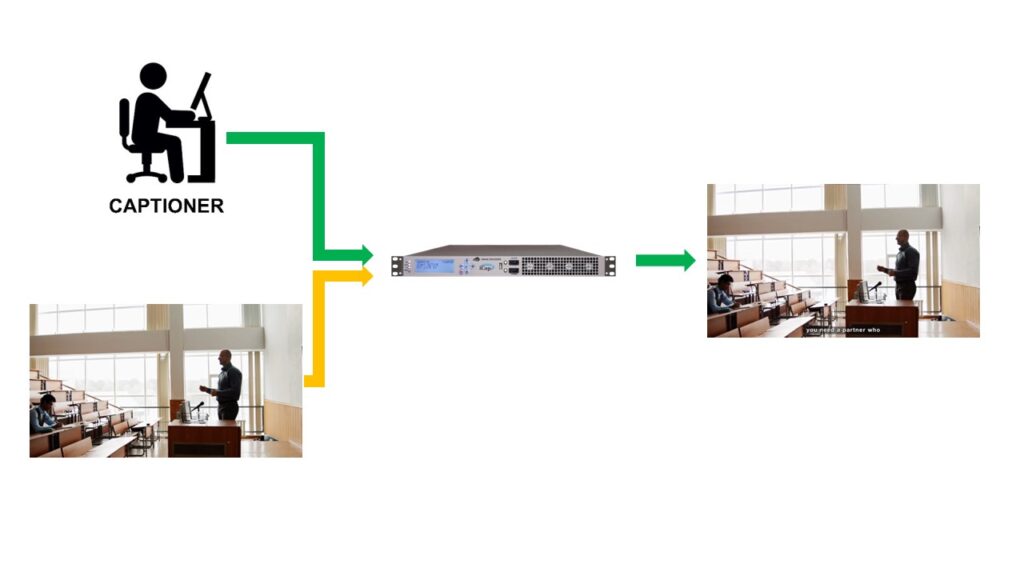
How it works
For on-site captioning, a stenographer will need to be set up near the iCap encoder while also being able to clearly hear what is to be captioned. While listening to the event, the stenographer will provide captions through their stenography machine directly to the iCap encoder. Once the iCap encoder receives these captions, it will overlay captions on the output video feed for the audience to see.
In this setup, the iCap encoder will not need a network connection in order to function properly.
Captioner Requirements
Since the captioner will be on-site for this setup, they will need a place to set up in order to provide captioning. Minimally, they will need the following:
- Table/Desk
- Chair
- Power
Audio/Video Setup
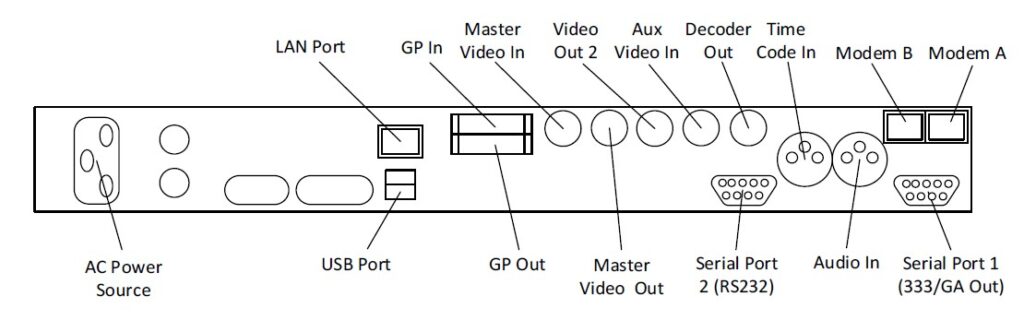
- Connect AC power
- 120-240V
- 50-60 Hz tolerant
- Connect the video source to the Master Video In port
- Uses a BNC connector
- Supports 3D-SDI, HD-SDI, and SD-SDI
- Connect the audio source to Audio In (if applicable)
- Only required if audio is not embedded in to your video feed
- Uses XLR
- A mixing board will be required to send audio to the audience and the encoder.
- The video from the encoder with captions will be delayed by 3-4 seconds. You may need to incorporate a time delay on the mixing board.
- Connect the video output that will be displayed in your venue per your event requirements
- For open captions (where captions cannot be turned off – recommended), you should connect your video output to the Decoder Out port.
- For closed captions (where captions can be turn on and off as needed), you should connect your video output to the Master Video Out port.
- Uses a BNC connector
- Supports 3D-SDI, HD-SDI, and SD-SDI
- Connect the captioner’s setup to Serial Port 2
- If needed by the captioner, the default settings for this port are:
- Baud: 1200
- Parity: Odd
- Data Bit Length: 7
- If needed by the captioner, the default settings for this port are:
- Power on the device
- If you own your own device, please pass along the device access code so our captioner can access the audio to provide captions.
- If you are renting a device from us, we will supply and already know the access code.
Displaying Test Captions
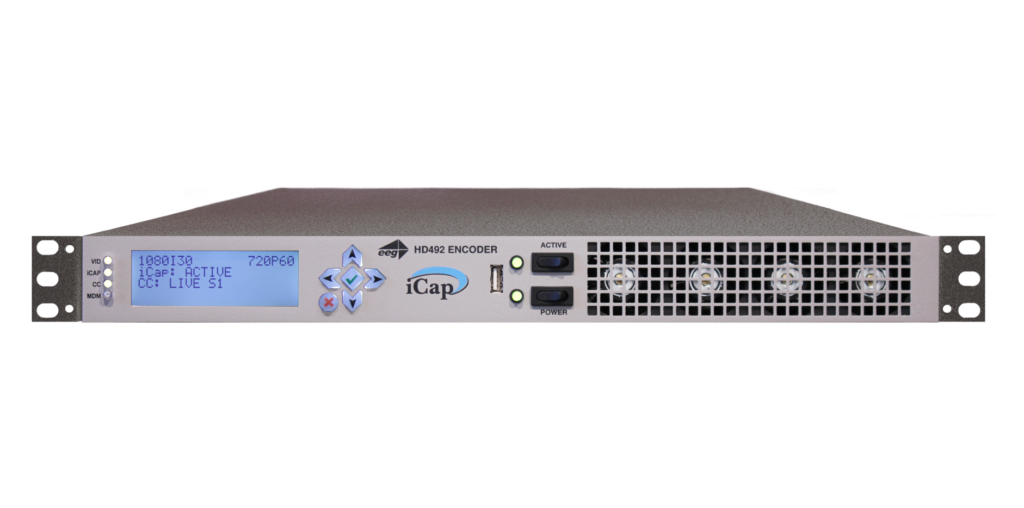
Being able to test your setup without having a captioner connected to the system will be important as you prepare for your event and save you money. This will ultimately tell you if everything is connected correctly and all settings are as they should be.
- Press the check mark button on the front panel of the iCap encoder
- Navigate to Utilities using the up and down arrows and press the check mark button.
- Navigate to Test Captions and press the check mark button.
- Navigate to Enable and press the check mark button.
- Navigate to On and press the check mark button.
- Exit the menu using the red ‘X’ button.
Please note that test captions will not show up if no video input feed exists.
Troubleshooting
Q: I am trying to display open captions in my venue, but captions are not visible. How can I turn on captions?
A: Press the check mark button on the front panel of the iCap encoder. Navigate to Decoder. Open the Decoder On menu and ensure that the setting is set to On.
Q: Can I change how open captions appear on screen?
A: Yes! Press the check mark button on the front panel of the iCap encoder. Navigate to Decoder. From this menu, you can chance the font size, color, and opacity to the bet fit settings for your event.